The Ultimate Workflow for 3D Printing a Simple Toy Car Model
Incorporating a Simple Toy Car 3D Printable Model into your creative or business process represents a perfect intersection of digital design and physical output. Whether you're a hobbyist prototyping a new idea, an educator preparing a hands-on lesson, or a small business owner testing a product concept, this model serves as a streamlined workflow component. Its primary value lies in its tested simplicity and immediate applicability, providing a reliable asset that requires minimal preparatory work to achieve a high-quality finished object.
Understanding the Model's Role in Your Process
The Simple Toy Car 3D Printable Model is not just a digital file; it is a calibrated endpoint in a chain of decisions. It arrives as an STL and 3MF file package, ready for integration into your slicing software. This tested model fits into the broader process of digital fabrication, sitting between the initial concept and the final printed object. Its existence eliminates the need for time-consuming CAD design work, allowing you to focus on the execution phase: printing, finishing, and utilizing the model for its intended purpose.
For creators and entrepreneurs, this translates to a significant efficiency gain. You can bypass the design and modeling stages and jump directly to production testing. This is particularly valuable when assessing material behavior, printer performance, or simply when you need a quick, tangible output for demonstration or gifting. The model acts as a standardized test piece or a final product in itself, depending on your project goals.
Pre-Project Integration: Preparation and Compatibility
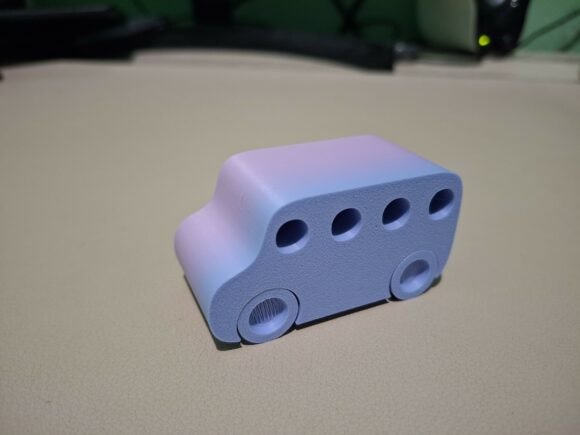
Before loading the file into your slicer, a few practical considerations ensure smooth integration. The model is provided in two distinct versions, which is a critical detail for planning. The small version, at 5.6 cm x 3 cm x 2.6 cm, is ideal for quick prints, material sampling, or creating multiples with less resource use. The big version, at 10 cm x 5.4 cm x 4.7 cm, offers a more substantial final product suitable for display or play. Your choice here influences material consumption, print time, and the ultimate use case.
Compatibility is assured, as the files have been specifically tested on a Bambu Lab A1 Mini with eSUN ePLA Matte Rainbow filament. This pre-testing removes a major variable from your workflow—you are not experimenting with untested settings on an unfamiliar model. You can confidently proceed knowing that the provided printing parameters are a direct path to a successful result. This level of validation is especially useful for professionals and educators who need reliable outcomes without iterative troubleshooting.
The Execution Phase: Printing Parameters and Workflow
The heart of the process is the execution phase, where digital instructions become a physical object. The recommended settings create a reliable template for your print job.
- Printer & Nozzle: Bambu Lab A1 Mini with 0.4 mm nozzle. This setup is common and accessible, making the workflow widely applicable.
- Wall Loops: 3. This ensures a sturdy shell for the toy car, providing durability without excessive material use.
- Sparse Infill: 10%. This balance maintains structural integrity while keeping print time and material usage efficient.
- Layer Height: 0.16 mm in High Quality mode. This setting delivers a fine surface finish, crucial for a visually appealing model without noticeable layer lines.
- Support: None required. This is a major workflow advantage, eliminating post-processing cleanup and reducing print time and potential surface damage.
Implementing these settings in your slicer software, such as Bambu Studio or OrcaSlicer, is straightforward. You import the 3MF file, which may already contain these parameters, or apply them manually to the STL. This step represents the final digital preparation before the physical workflow begins. The lack of needed support structures is a key efficiency factor, simplifying both the print process and the post-processing stage.
Material Considerations and Quality Control
The model was tested with eSUN ePLA Matte Rainbow filament, a choice that impacts both the aesthetic outcome and the printing process. Matte finishes reduce shine and can hide minor surface imperfections, while the rainbow variant offers a vibrant, changing color effect without the need for painting or post-processing. This integration of material choice with the model design highlights how a well-defined workflow considers all aspects of the final product.
For your own implementation, you can adapt the material based on your needs. Standard PLA will work flawlessly with the same settings, while other materials like PETG may require slight adjustments to temperature. The provided settings serve as a stable baseline, allowing you to maintain consistency across prints or experiment with controlled variables. This is valuable for small businesses producing multiple units or educators running repeated classroom prints.
Post-Production and Practical Application
Once the print finishes, your workflow moves to application. With no supports to remove, the model is ready for use almost immediately. This immediacy is a core benefit. For hobbyists, the car can be a desk ornament, a gift, or a component in a larger diorama. For educators, it becomes a tangible example of 3D printing technology, a physics teaching aid for wheels and axles, or an art project base. For entrepreneurs and marketers, it can serve as a promotional item, a product prototype, or a physical asset for content creation.
The model's single-piece design is a deliberate feature for ease of use. There is no assembly required, which streamlines the process from printer to function. This design philosophy prioritizes usability and minimizes the steps between printing and achieving your project goal. It interacts seamlessly with other tools or methods—the car can be painted, weighted, modified, or used as a reference model for further CAD work.
Long-Term Integration into Your Creative Routine
Incorporating reliable, tested models like this Simple Toy Car into your regular workflow builds a library of trusted assets. You can print it repeatedly with confidence, using it as a benchmark for new printers, filaments, or settings. Its small size makes it an economical test piece, while its larger version can become a standard output for specific applications.
For ongoing projects, consider how this model fits into a sequence. It could be the first print in a series of toy models, a consistency check between major projects, or a training model for new team members learning the 3D printing process. Its simplicity ensures it never becomes a bottleneck or a source of frustration, allowing you to maintain focus on your broader creative or business objectives.
Outcomes and Process Optimization
The ultimate outcome of using this predefined model is a predictable, high-quality physical object achieved with minimal process overhead. You avoid the common pitfalls of 3D printing: failed prints due to bad settings, long post-processing times, and unsatisfactory surface quality. This optimization frees up your time and resources for the activities that matter more—designing new concepts, running your business, or teaching your students.
By following the tested workflow, you reinforce a principle of efficient creation: use validated components to accelerate development. The Simple Toy Car 3D Printable Model exemplifies this. It is a plug-and-play asset within the 3D printing ecosystem, designed to integrate smoothly with common hardware and software. Whether your next step is showcasing the print, iterating on the design, or simply enjoying the result, your workflow benefits from the clarity and reliability built into this model from the start.